2. Connecting the Device
You connect using just a browser — no separate app needed. Follow the one method that fits your situation.
Method A — New device (or a reset device) ★Easiest
- Power ON the blind (a small movement and return means it's ready).
- On your phone/PC, connect to the blind's Wi-Fi name (EZS...) in Wi-Fi settings.
- The password is
u67184+ the last 3 characters of the device name (ID). e.g. if the device name isEZS...123, the password isu67184123
- The password is
- Type
192.168.4.1in your browser's address bar (the Google Chrome browser is recommended)
A setup screen like the one below appears. Follow the on-screen guidance to complete the Upper/Lower Limit Setup first, then choose a connection method.
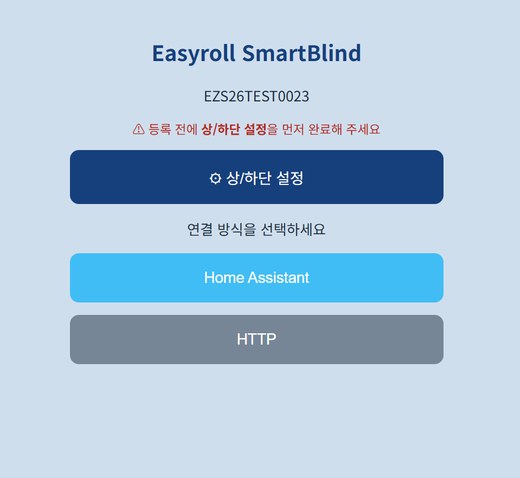
Step 4 ⚙ Upper/Lower Limit Setup — do this first
For the HA position slider (%) to work accurately, you must first tell the blind where its "top/bottom" are. On the home screen, tap [⚙ Upper/Lower Limit Setup].
Skip this if the motor's limits are already set
A device whose Upper/Lower limits were already set in the EasyRoll app has those values saved in the motor, so there's no need to set them again. Jump straight to Step 5 — Enter HA connection info.
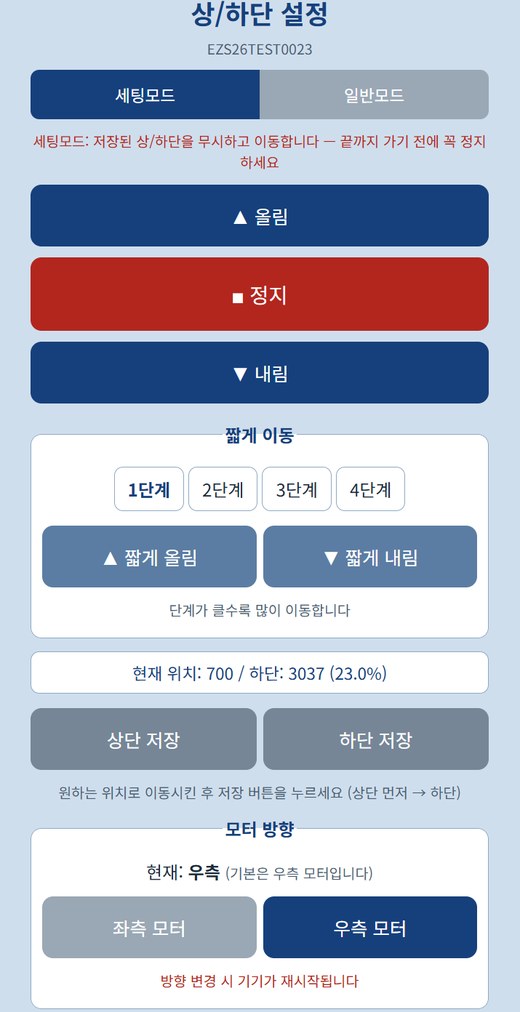
- In Setup Mode, use ▲Up / ▼Down to move to the top position you want → [Save Upper]
- ⚠️ Setup Mode ignores saved limits and keeps moving. Be sure to press ■Stop before it reaches the end.
- Move to the bottom position the same way → [Save Lower] (order: Upper first → then Lower)
- Switch to Normal Mode and press ▲/▼ to confirm it stops properly at the saved positions.
- Use jog (steps 1–4) for fine adjustment. (The larger the step, the more it moves.)
- If the direction is reversed, swap Left/Right under Motor Direction. (Right by default; the device restarts when changed.)
💡 The Current position / Lower (%) display on screen shows where it is right now. 💡 Even after registration, you can reconfigure anytime at
http://<blind IP>:20318/limitsetup.
Step 5 — Enter HA connection info
Once the Upper/Lower Limit Setup is done, return to the home screen and tap [Home Assistant].
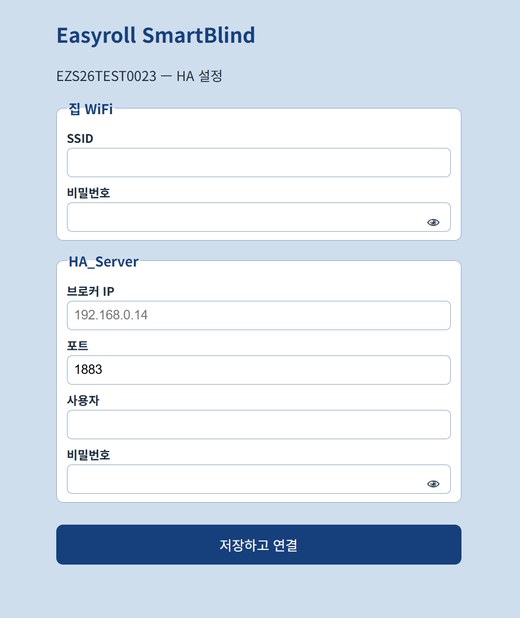
| Section | Fields |
|---|---|
| Home Wi-Fi | SSID (Wi-Fi name) · password |
| HA_Server | Broker IP · port (1883) · username · password ← the values you noted in Document 1 |
💡 Tap the 👁 icon in the password field to reveal what you typed.
Tap [Save and Connect] and the device restarts, connecting automatically to your home Wi-Fi + HA.
It's normal for the screen to freeze or show 'Not connected' right after saving
When you save, the blind turns off its own Wi-Fi (EZS...) and moves to your home Wi-Fi. Because your phone/PC's connection to the device is dropped automatically, the browser page may not open or may look like an error. This is not a malfunction.
- Reconnect your phone/PC's Wi-Fi to your usual home Wi-Fi.
- Wait a moment (about 1 minute), then check Verify the connection below to see if it registered in HA.
Once connected, the blind registers automatically in HA. You don't need to press any extra Add button.
Method B — A device already connected to and in use with the EasyRoll app
This switches to HA without resetting the device.
- Find the blind's IP — you can see it in the EasyRoll app's device info.
- In your browser, go to
http://<blind IP>:20318/hasetup(the Google Chrome browser is recommended) - Enter the HA broker info → [Switch to HA_Server · Save]
- After the restart, it registers automatically in HA
Reverting to the EasyRoll app
When you want to disconnect from HA and go back to using the EasyRoll app, press one of the two buttons below.
| Location | Button |
|---|---|
.../20318/hasetup (same page) |
[Restore Easyroll_Server] |
Bottom of the .../20318/limitsetup page |
[Switch to Easyroll Mode] |
Device state after switching
- A device that was registered in the EasyRoll app — works right away in the app after a few seconds.
- A device that was never registered in the app — after a few minutes, the LED repeats "blink 3 times → pause 2 seconds". (Waiting-for-registration state.)
- Do a device registration in the EasyRoll app to use it.
Verify the connection
- In HA: Settings → Devices & Services → MQTT → if the blind (EZS...) appears in the device list, it worked.
- Test movement with the ▲/▼/■ buttons on the device card.
Adding to the dashboard
Connecting registers the device, but to make it visible on your dashboard (home screen) you need one more step. There are two ways — ① Assign an area is the simplest, and if you want to place it exactly where you like, use ② Add a card.
① Placing the device in the "Living Room" (recommended)
Putting a device in an area (room) lets HA's default dashboard organize it by room automatically.
- Settings → Devices & Services → the [Devices] tab at the top
- Select the blind (
EZS...) from the list. - Click the ⚙ (gear) or [Settings] on the device info card.
- Under Area, choose Living Room and click [Update].
- If the room you want isn't there, type a name in the box to create a new one.
- Back on the dashboard, the blind appears inside the Living Room section.
💡 You can also rename the device here (e.g.
EZS...→ Living Room Blind). Pick a name that's easy to call in voice commands or automations.
② Adding it to the dashboard as a card
Use this when you want to place it in a specific spot on a specific dashboard.
- On the dashboard screen, click the ✏️ (pencil) at the top right to enter edit mode.
- Click [+ Add Card].
- From the card types, pick Tile or Entities.
- In the Entity field, type
cover.and select the blind. (e.g.cover.ezs16a4106036) - [Save] → exit edit mode and the card is placed on the dashboard.
💡 The Tile card shows open/close/stop buttons in a single row and is the easiest to use. 💡 To put several blinds on one card, add multiple blinds to an Entities card.
Good to know
- The EasyRoll app and HA cannot be used at the same time. Once connected to HA, EasyRoll app control stops. (The remote and buttons always work on either side.)
- Doing a factory reset (hold the button 5 seconds) clears the HA settings and returns the device to its default (EasyRoll app) state.
- Once you've saved the HA info, you can switch servers later with a single command → 4. Advanced Commands